
QoreID Flutter SDK
NoteYou can perform all Collection services including VeriFind (digital address verification), Passport, Driver’s License, and other QoreID services on both Android and iOS.
The latest version of QoreID fluttter sdk requiresUIScenemigration.
From v2.0.0, the Flutter SDK launches with a singlesessionTokenminted by your backend viaPOST /v1/sessions— your client credentials stay on your server, and the product or workflow is encoded inside the token. See SDK Session Tokens.If you have already integrated a version less than v2, here's how to continue using the previous version of our react native SDK.
Installation
flutter pub add qoreidsdkdart pub add qoreidsdkImportant
Before runningpod install, comment outuse_frameworks!in yourios/Podfileif present:# use_frameworks! # ← Comment this line
Then install pods:
cd ios
pod install
Note
You must rebuild your app after installation:flutter clean && flutter pub get && flutter run
Android Setup
1. Add QoreID Maven Repository
In android/build.gradle (inside repositories block):
repositories {
    google()
    mavenCentral()
    maven { url "https://repo.qoreid.com/repository/maven-releases/" }
    maven { url 'https://jitpack.io' }
}
2. ProGuard Rules (for release builds)
Create or update android/app/proguard-rules.pro:
-keep class com.qoreid.sdk.** { *; }Then reference it in android/app/build.gradle:
buildTypes {
    release {
        minifyEnabled true
        proguardFiles getDefaultProguardFile('proguard-android-optimize.txt'), 'proguard-rules.pro'
    }
}
3. Initialise in MainActivity
Kotlin (MainActivity.kt):
import com.qoreid.qoreidsdk.QoreidsdkPlugin

override fun onCreate(savedInstanceState: Bundle?) {
    super.onCreate(savedInstanceState)
    QoreidsdkPlugin.initialize(this)
}
import com.qoreid.qoreidsdk.QoreidsdkPlugin;
@Override
protected void onCreate(Bundle savedInstanceState) {
super.onCreate(savedInstanceState);
QoreidsdkPlugin.initialize(this);
}4. Permissions (VeriFind)
Add to android/app/src/main/AndroidManifest.xml:
<uses-permission android:name="android.permission.ACTIVITY_RECOGNITION" />
<uses-permission android:name="android.permission.ACCESS_COARSE_LOCATION" />
<uses-permission android:name="android.permission.ACCESS_FINE_LOCATION" />
<uses-permission android:name="android.permission.ACCESS_BACKGROUND_LOCATION" />
See full permission list: https://docs.qoreid.com/docs/permissions
iOS Setup
1. Wrap Window Scene in UINavigationController
Update ios/Runner/SceneDelegate.swift:
//ios/Runner/SceneDelegate.swift
import Flutter
import UIKit

// Class name must match filename
class SceneDelegate: FlutterSceneDelegate {

    let flutterEngine = FlutterEngine(name: "main_flutter_engine")

    override func scene(
        _ scene: UIScene,
        willConnectTo session: UISceneSession,
        options connectionOptions: UIScene.ConnectionOptions
    ) {
        guard let windowScene = scene as? UIWindowScene else { return }

        // 1. Start the Flutter engine and register plugins
        flutterEngine.run()
        GeneratedPluginRegistrant.register(with: flutterEngine)

        // 2. Register scene lifecycle so Flutter reacts to
        //    foreground/background transitions correctly
        self.registerSceneLifeCycle(with: flutterEngine)

        // 3. Build the Flutter view controller
        let flutterViewController = FlutterViewController(
            engine: flutterEngine,
            nibName: nil,
            bundle: nil
        )

        // 4. Wrap in a UINavigationController — required by QoreID SDK
        //    so it can push its own view controllers onto the stack
        let navigationController = UINavigationController(
            rootViewController: flutterViewController
        )
        navigationController.setNavigationBarHidden(true, animated: false)
        navigationController.navigationBar.isTranslucent = false

        // 5. Assign the navigation controller as the window root
        window = UIWindow(windowScene: windowScene)
        window?.rootViewController = navigationController
        window?.makeKeyAndVisible()

        // 6. Call super AFTER window setup, as required by FlutterSceneDelegate
        super.scene(scene, willConnectTo: session, options: connectionOptions)
    }
}
2. Update AppDelegate
import Flutter
import UIKit

@main
@objc class AppDelegate: FlutterAppDelegate {

    override func application(
        _ application: UIApplication,
        didFinishLaunchingWithOptions launchOptions: [UIApplication.LaunchOptionsKey: Any]?
    ) -> Bool {
        return super.application(application, didFinishLaunchingWithOptions: launchOptions)
    }

    // MARK: - QoreID Scene Support
    override func application(
        _ application: UIApplication,
        configurationForConnecting connectingSceneSession: UISceneSession,
        options: UIScene.ConnectionOptions
    ) -> UISceneConfiguration {
        let config = UISceneConfiguration(
            name: "Default Configuration",
            sessionRole: connectingSceneSession.role
        )
        config.delegateClass = SceneDelegate.self
        return config
    }

  func didInitializeImplicitFlutterEngine(_ engineBridge: FlutterImplicitEngineBridge) {
    GeneratedPluginRegistrant.register(with: engineBridge.pluginRegistry)
  }
}
3. Add Privacy Descriptions
In ios/Runner/Info.plist:
<key>NSCameraUsageDescription</key>
<string>We need camera access to capture documents and selfies.</string>
<key>NSPhotoLibraryUsageDescription</key>
<string>We need photo library access to let you upload documents.</string>
<key>UIApplicationSceneManifest</key>
	<dict>
		<key>UIApplicationSupportsMultipleScenes</key>
		<true/>
		<key>UISceneConfigurations</key>
		<dict>
			<key>UIWindowSceneSessionRoleApplication</key>
			<array>
				<dict>
					<key>UISceneConfigurationName</key>
					<string>Default Configuration</string>
					<key>UISceneDelegateClassName</key>
					   <string>$(PRODUCT_MODULE_NAME).SceneDelegate</string>
				</dict>
			</array>
		</dict>
	</dict>
For VeriFind 4D (Location + Motion)
<key>NSMotionUsageDescription</key>
<string>Required for accurate address verification using device motion.</string>
<key>NSLocationWhenInUseUsageDescription</key>
<string>Required for address verification services.</string>
<key>NSLocationAlwaysAndWhenInUseUsageDescription</key>
<string>Required for background location during address verification.</string>

<!-- You also need to indicate that your app supports background location updates -->
<key>UIBackgroundModes</key>
<array>
    <string>location</string>
</array>
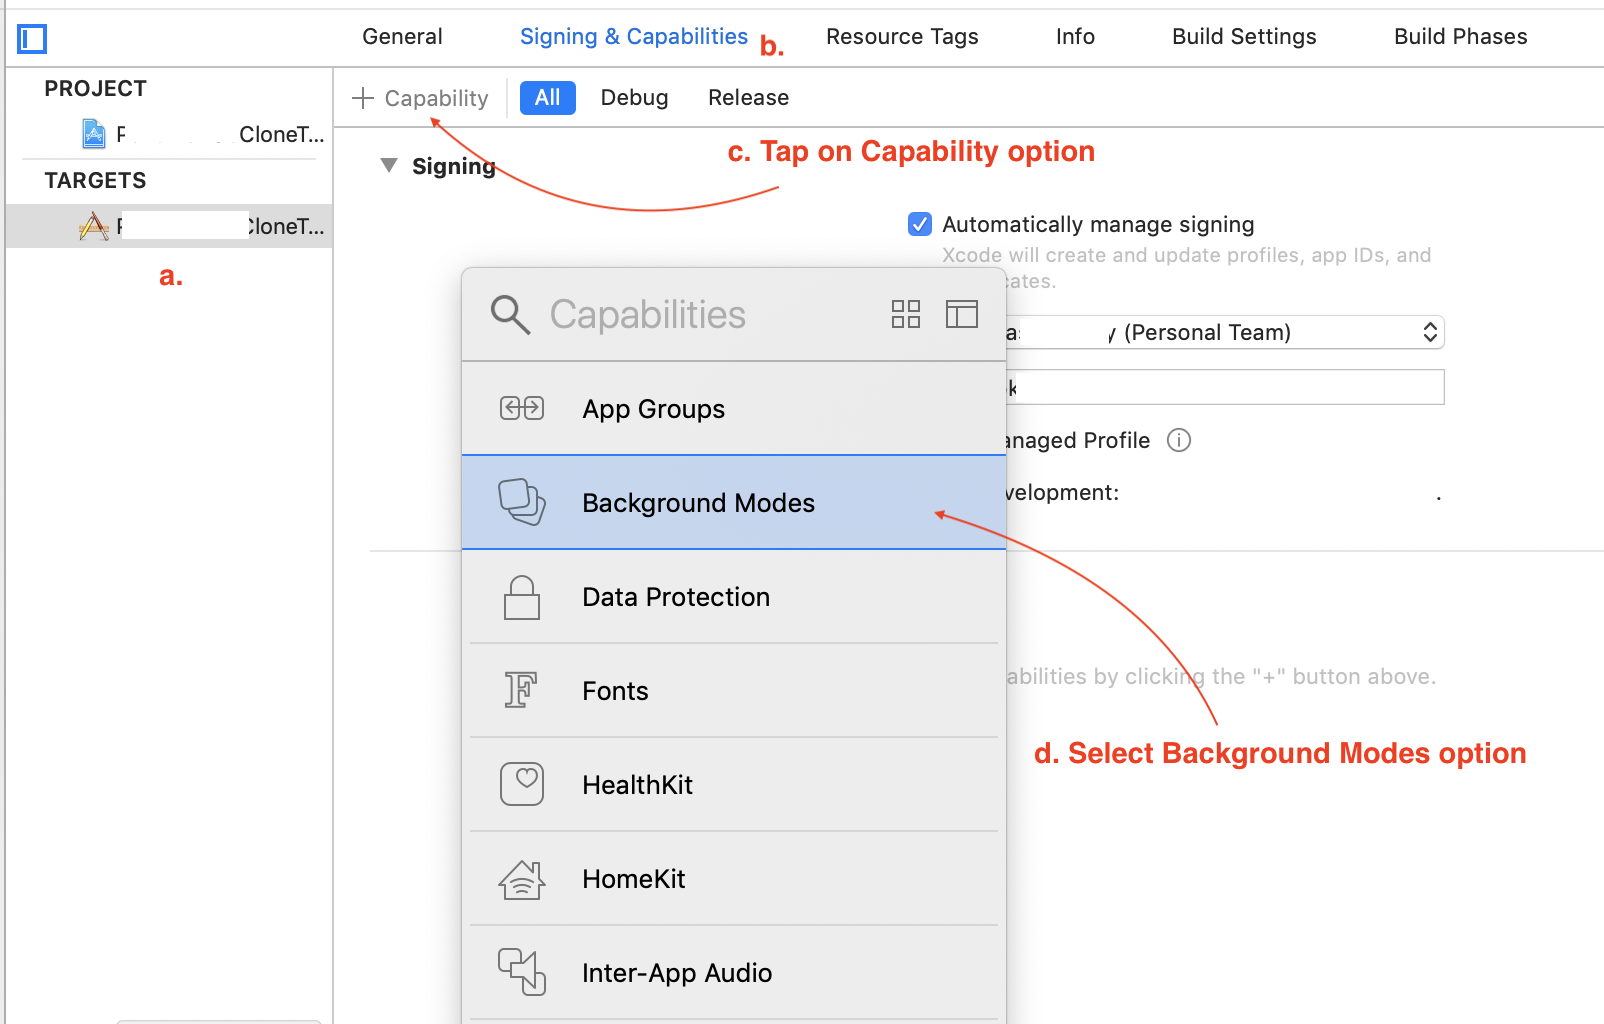
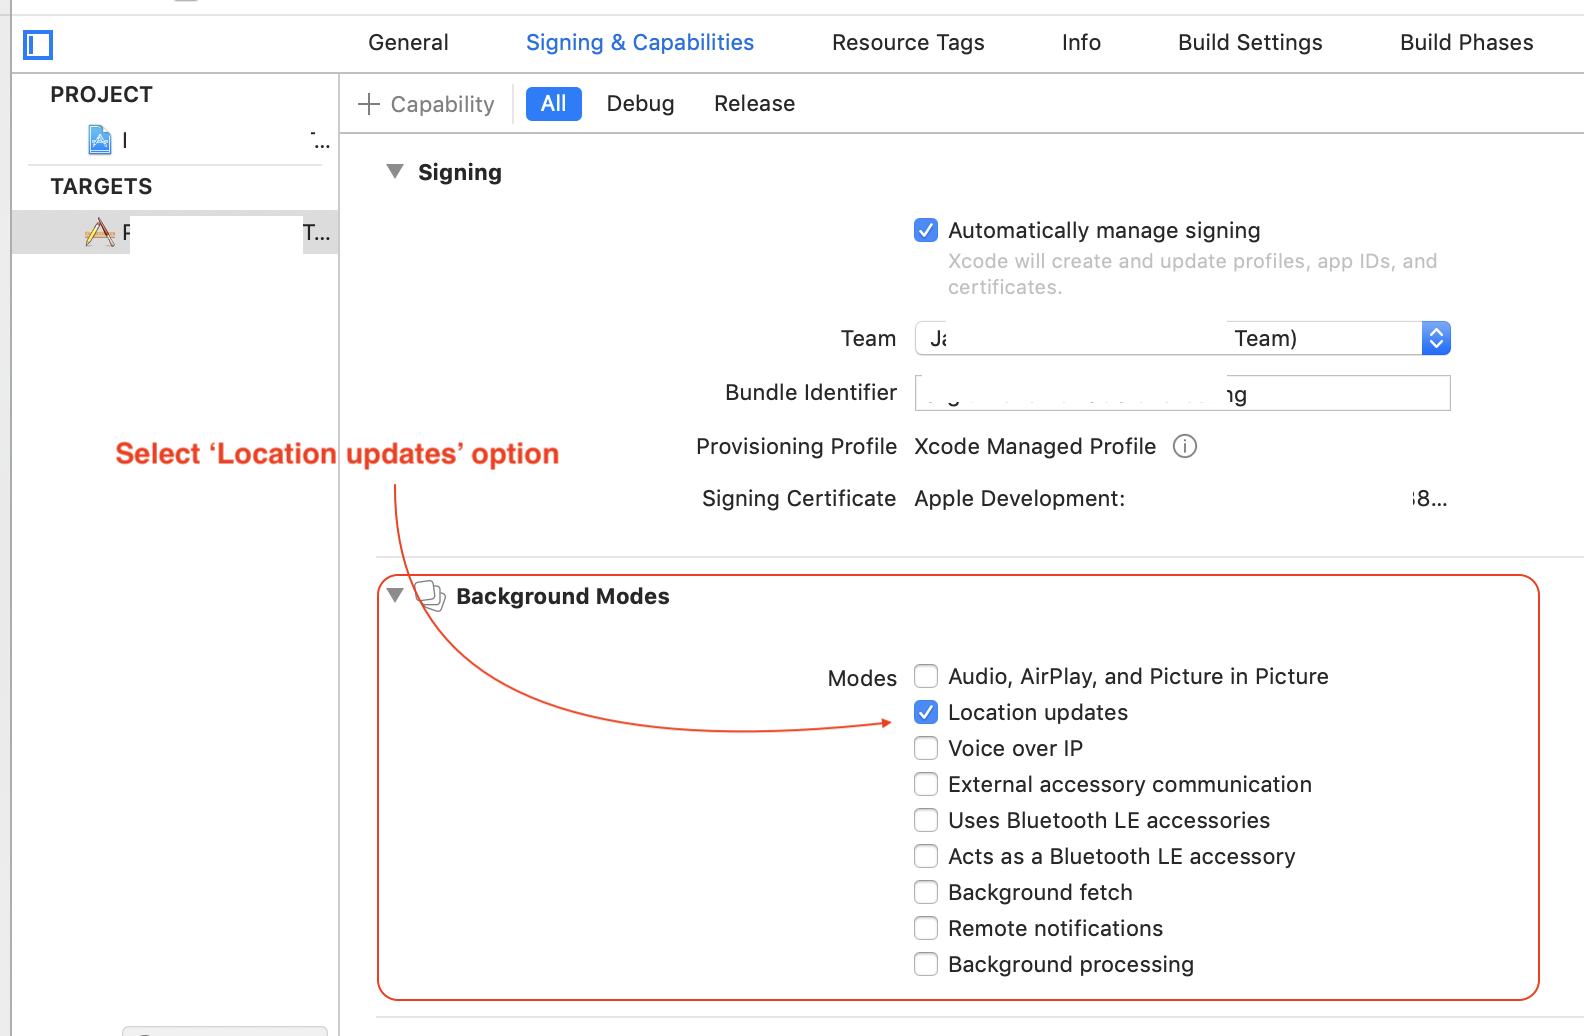
Also enable Background Modes → Location updates in Xcode project settings.
Usage Example
import 'package:flutter/material.dart';
import 'package:qoreidsdk/qoreidsdk.dart';

void main() => runApp(const MyApp());

class MyApp extends StatelessWidget {
  const MyApp({super.key});
  @override
  Widget build(BuildContext context) {
    return MaterialApp(
      home: const HomePage(),
      theme: ThemeData(useMaterial3: true),
    );
  }
}

class HomePage extends StatefulWidget {
  const HomePage({super.key});
  @override
  State<HomePage> createState() => _HomePageState();
}

class _HomePageState extends State<HomePage> {
  @override
  void initState() {
    super.initState();
    _listenToResults();
  }

  void _listenToResults() {
    Qoreidsdk.onResult((result) {
      print('QoreID Result: $result');

      if (result['data']?['verification'] != null) {
        final verificationId = result['data']['verification']['id'];
        print('Verification ID: $verificationId');
      }
    });
  }

  void _launchQoreID() async {
    final data = QoreidData(
      sessionToken: "your-session-token", // from your backend (POST /v1/sessions)
      addressData: {},
      applicantData: {},
      ocrAcceptedDocuments: "",
      identityData: {},
    );

    await Qoreidsdk.launchQoreid(data);
  }

  @override
  Widget build(BuildContext context) {
    return Scaffold(
      appBar: AppBar(title: const Text('QoreID SDK Demo')),
      body: Center(
        child: ElevatedButton(
          onPressed: _launchQoreID,
          child: const Text('Launch QoreID Verification'),
        ),
      ),
    );
  }
}
The session token determines whether the SDK runs in Collection or Workflow mode and which product or workflow it is scoped to.
Changelog
See full changelog → pub.dev/changelog
Next Steps
Updated about 1 month ago